Nondestructive Testing
Nondestructive testing is widely used in the field of industry. The technology does not destroy parts or materials, can be detected on site directly wtih high efficiency. At present, the most common non-destructive testing there are five kinds:
- UT(Ultrasonic Testing)
- RT(Radiographic Testing)
- MT(Magnetic Particle Testing)
- PT(Penetrant Testing)
- ET(Eddy Current Testing)
UT(Ultrasonic Testing)
Principle
In a certain speed and direction,this mechanical wave can transmit in the material. And it will produce reflection when it encounters a heterogeneous interface with different acoustic impedance. Heterogeneous interface could be a defect or a bottom surface of the object being measured. This reflective phenomenon can be used for ultrasonic flaw detection.
Application
The pulse oscillator emits a voltage to the probe, which emits ultrasonic waves that propagate in the material with the help of water or oil.
Ultrasonic waves hit the defect and then reflect energy by the original path to the probe. The probe converts it into an electrical pulse and displayed on the oscilloscope screen.According to the position and amplitude of the wave, the position and approximate size of the defect can be determined. (Compare with the amplitude of the reflection wave of artificial defects in the test block).
In addition to the Echo method, the another use of probe is to receive Penetration signal on the other side of the workpiece. In ultrasonic method, it usually uses sonic velocity, attenuation and resonance of the workpiece to detect physical properties of the materials.
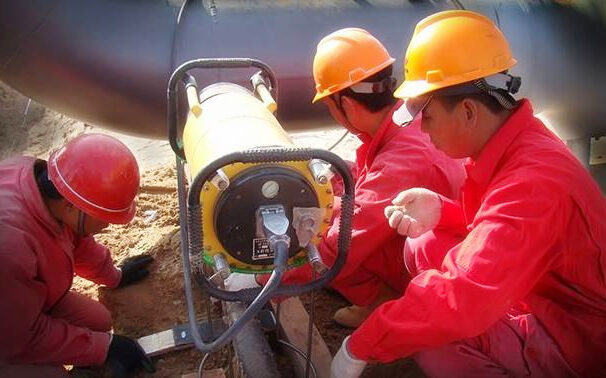
RT(Radiographic Testing)
This is the most basic and prevalent NDT method.
1 X-ray characteristic: X-ray is a photon. Its electromagnetic wave are short, the wavelength of 10~10cm.
X-ray has the following characteristics:
1) Penetrating. X-ray can penetrate the general visible light is not through the material. The strength of its penetrating ability is related to the wavelength of X-rays and the density and thickness of the penetrated matter. the shorter the wave, the greater the penetration force. But the density and thickness will decrease as the wave gets shorter. In practice, tube’s voltage volt value (kv) determines the X-ray penetration (i.e., X-ray mass). And the value of X-rays= the X-ray current (MA) times unit time.
2) Ionization is that material absorbs X-rays or other rays (e.g. gamma rays), then its molecules are decomposed into positive anions. The amount of ions and the X-rays absorbed by the substance are proportional. The amount of X-rays can be calculated by the following factors:
- Ionization degree of air
- Ionization degree of other substances
2.The principle of X-ray image formation is: the difference between the characteristics of X-ray and the density and thickness of the parts.
MT(Magnetic Particle Testing)
Magnetic particle detection can only detect the surface of ferromagnetic materials or near-surface defects. Because the magnetic traces are accumulated on the detected surface, so can visually display the discontinuous shape, position and size. It also can determine the general attribute.
The sensitivity of magnetic particle detection can reach 0.1μm by the discontinuous width. With multiple magnetization methods, the size and geometrical shape of workpiece nearly can not effect the magnetic particle detection. What’s more, it can detect defects in all directions of the workpiece.
It suits the Nondestructive testing for Stainless Steel Fittings especially.
PT(Penetrate Testing)
Principle
The basic working principle of Penetration detection:
- Capillary action of liquid.
- Luminescence phenomenon of solid dyes under certain conditions.
Therefore, Penetration detection is to check if there is coated dye penetrates the surface of the workpiece. If there is a defect, the traces of the penetrate will appear under a certain light source. It detects the appearance and distribution of defects.
Steps
- Pre-treatment
- Under the action of capillary, after a certain time, the penetrate can penetrate the opening defect at surface.
- Remove the excess penetrate and dry.
- Then apply the adsorption medium—the imaging agent on the surface. Because of capillary action, the Imaging agent will attract the dye in the defect.
- Observation record and evaluation.
Attention
Human factors influence the testing result a lot. So in order to ensure the reliability of test results, inspectors must operate in strict accordance with relevant standards.
This Nondestructive testing method could serve metal and non-metal products.
ET(Eddy Current Testing)
Principle
Place coil with alternating current on the metal plate or pipe. At the same time, an alternating magnetic field is generated in and around the coil. Then the specimen produced a vortex-like induction alternating current, known as Eddy Current.
Influence Factor of Eddy
The distribution and size of the eddy depends on
- Shape and size of the coil.
- Size and frequency of alternating current.
- Conductivity and permeability of the specimen.
- Shape and size of specimen, and the distance to the coil.
- Crack defects at the surface.
Results You Get
Thus, keeping other factors relatively unchanged, measuring magnetic field changes caused by eddy currents, the following information can be inferred:
- The size and phase change of the eddy current in the specimen
- Information about the conductivity and defects
- The material properties and other physical quantities (such as shape, size, etc.)
However, because the eddy current is alternating currents, the results can only reflect the situation of surface or near the surface. This Nondestructive testing method usually for rapid detection of metal pipes, rods and wires on the production line.
Latest News
 02 8 月 2019Copper Nickel Flanges UNS C70600Zizi offers ISO certified copper nickel flanges, stores large quantity of Cu-Ni 90/10 weld neck flan...
  29 7 月 2019Stainless Steel Buttweld Fittings ManufacturerZizi is stainless steel buttweld fittings manufacturer, we offer stainless steel pipe elbow, tee, ca...
  19 7 月 2019Steel Pipe Nipple Types, Dimensions and MaterialsBasic pattern of steel pipe nipple is a short piece of pipe with threads at both end or at one end....
